

How To Install Wainscoting Using Wood Panels For A Classic Look
There’s something timeless about the crisp, classic lines of wainscoting. Whether you want to add elegance to a hallway, warmth to a bedroom, or a refined feel to your living room, installing wainscoting using wood panels is one of the most effective ways to transform a space, without the need for a full remodel.
If you’ve been wondering how to install wainscoting without the headache of hiring contractors or managing messy construction, you’re in the right place. With today’s quality wood panel options, creating a beautifully finished wainscoted wall can be a straightforward DIY project that saves you money while delivering a high-impact upgrade.
At Woody Walls, we believe upgrading your walls should be accessible, eco-friendly, and beautiful. Our solid wood slat panels and peel-and-stick wood planks offer easy installation with stunning results, helping you bring your vision to life without the usual frustrations of remodeling. Whether you’re aiming for a modern accent wall or a traditional wainscoting look, our range of panels makes it simple to design a space that feels uniquely yours.
Ready to dress up your walls and give your home a touch of classic sophistication? Let’s walk you through everything you need to know about how to install wainscoting – step by step.
What Is Wainscoting?
Wainscoting is a decorative and functional wall treatment that typically covers the lower portion of your walls, adding architectural interest and a finished look to any room. Originally used in historic homes to protect plaster walls from scuffs and moisture, wainscoting has evolved into a design feature that blends both classic charm and modern style seamlessly.
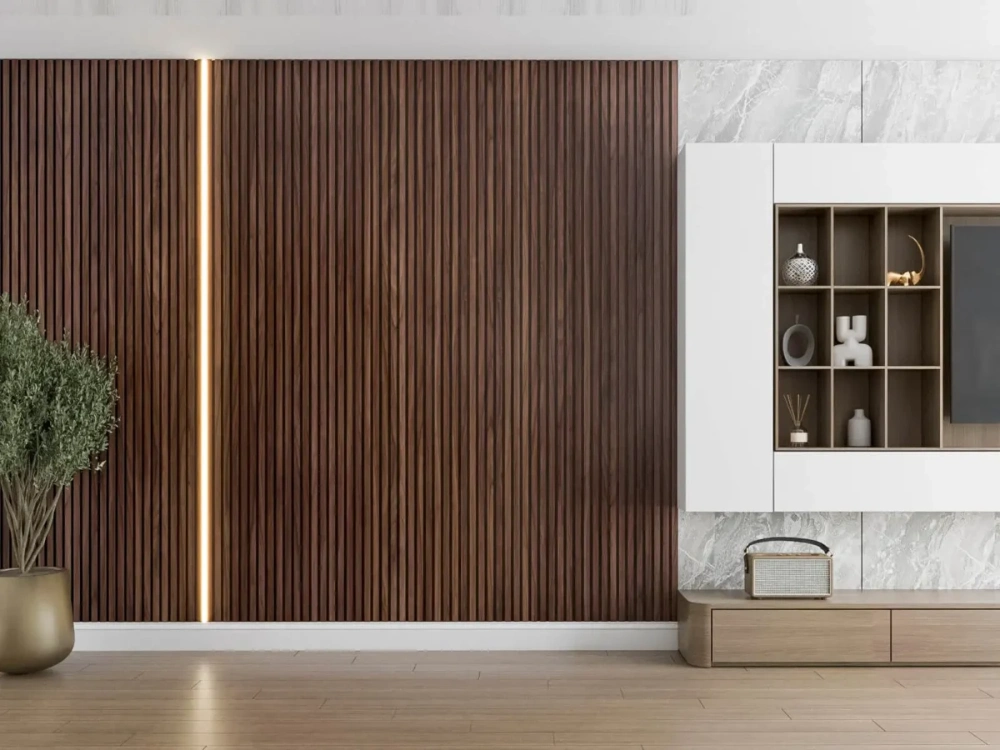
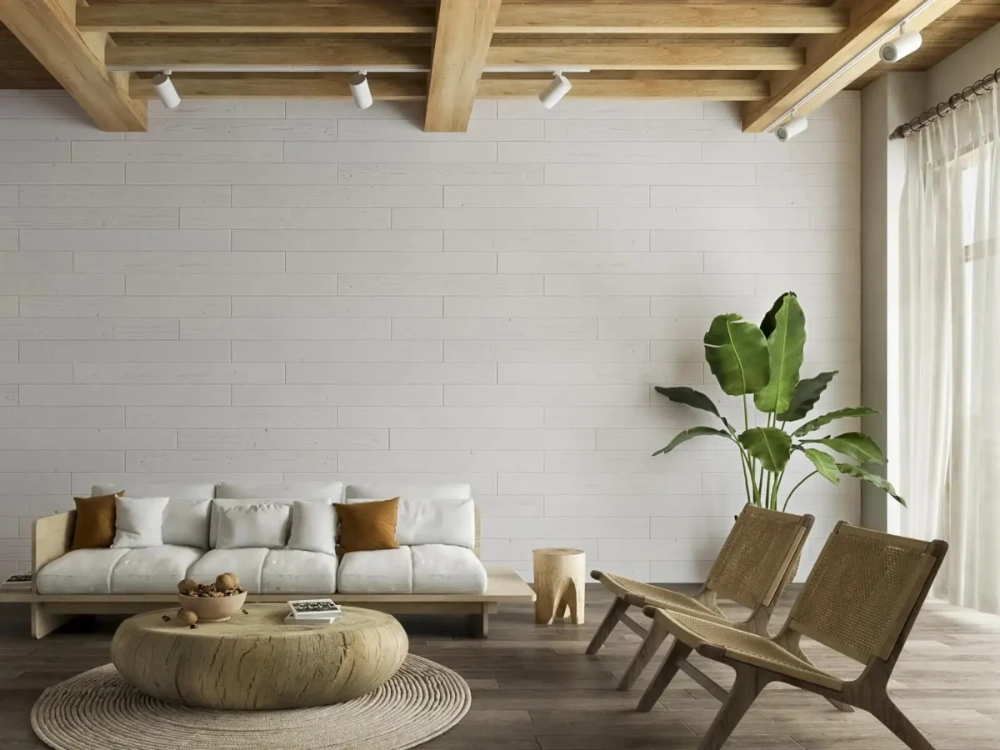
Using wainscoting panels on walls not only creates visual depth but can also make a room feel taller by drawing the eye upward. You can choose from various heights depending on the style you want to achieve, from a traditional chair rail height to floor-to-ceiling paneling for a bold statement.
What makes wall panels wainscoting particularly appealing today is its versatility. Whether you’re looking to add a cozy, rustic feel to a living space or a clean, contemporary look to a hallway, wood panels can be tailored to match your aesthetic. And with the right materials, like solid wood slat panels or peel-and-stick wood planks, achieving a professional look is easier than ever, even if you’re new to DIY projects.
In the next section, we’ll help you choose the best wood panels for your wainscoting project, so you can confidently move forward with creating a classic and stylish interior upgrade.
Choosing the Right Wood Panels for Wainscoting
Selecting the right wood panels will set the tone for your wainscoting project and ensure a high-quality, lasting finish.
What to consider when choosing panels:
- Height of your wainscoting: Lower heights create a classic, balanced look. Full-height panels deliver a bold, modern statement.
- Style of your space: Match your room’s existing design, whether traditional, rustic, or contemporary.
- Color and finish: Choose tones that complement your current palette, from warm rustic browns to sleek modern neutrals.
Woody Walls panels are ideal for wainscoting:
Provide clean, modern lines while improving sound absorption. Perfect for living rooms, home offices, and hallways.
Allow for easy, tool-free installation with no nails or glue. Ideal for beginners seeking a clean, professional result without heavy tools.
With the right panels chosen, you are ready to gather the tools and materials needed to start your project with confidence.
Tools and Materials You Will Need
Before you start learning how to install wainscoting, gather all necessary tools and materials to ensure a smooth, efficient workflow.
Essential tools:
- Measuring tape
- Pencil
- Level
- Stud finder
- Miter saw or hand saw (for trimming panels if needed)
- Nail gun or hammer with finishing nails
- Construction adhesive (if not using peel-and-stick panels)
- Caulk and caulking gun
- Sanding block (for minor surface prep)
- Paint or stain (optional, if you wish to customize your panels)
Materials:
- Wood panels for wainscoting (acoustic slat panels, peel-and-stick planks, or your chosen style)
- Trim or molding for the top edge (optional for a finished look)
- Painter’s tape (for marking guidelines and protecting edges)
If you are using Peel-and-Stick Wood Planks, you will not need adhesives, nails, or heavy tools. These panels can be applied directly to your wall, making them ideal if you want to know how to install wainscoting over drywall without additional mess or complexity.
Taking the time to prepare your tools and materials will help your wainscoting installation go smoothly, ensuring clean lines and a professional finish.
Next, you will learn how to install wainscoting and start installing your panels confidently.
Step-by-Step Guide: How to Install Wainscoting
How to Install Wainscoting? Installing wainscoting using wood panels is a rewarding DIY project that can dramatically enhance your space. Here is a clear, step-by-step guide to help you achieve a clean, professional finish.
1. Plan Your Layout
- Measure the wall height and decide how high you want your wainscoting to be.
- Mark the top edge of your panels using a level and pencil to ensure a straight guide.
- Use a stud finder to locate and mark the studs along the wall. This will help when securing panels.
2. Prepare Your Walls
- Clean the wall surface thoroughly to remove dust and debris.
- If installing wainscoting over drywall, lightly sand glossy areas for better adhesion.
- Repair any holes or cracks in the wall to ensure a smooth application surface.
3. Cut and Measure Panels
- Measure and cut panels to fit your wall, accounting for outlets, corners, and windows.
- Use a miter saw for clean edges, especially if adding trim or molding.
- Dry-fit panels along the wall to confirm alignment before attaching.
4. Install the Panels
- For peel-and-stick panels:
- Remove the adhesive backing and press firmly onto the wall, starting from one corner and working across.
- Use a level frequently to ensure panels stay straight during installation.
- For traditional wood panels:
- Apply construction adhesive to the back of each panel.
- Position panels on the wall, pressing firmly, then secure with finishing nails into studs.
- Check alignment continuously to maintain clean, level lines.
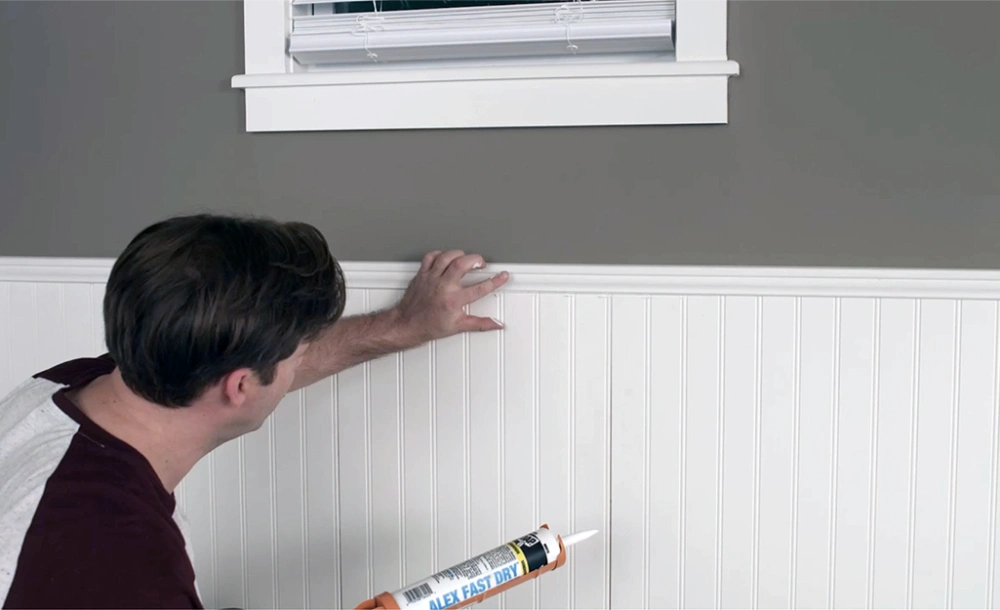
5. Add Trim and Finish
- Install top trim or molding to create a finished edge along the top of your wainscoting if desired.
- Fill nail holes with wood filler and lightly sand once dry.
- Caulk seams where panels meet for a seamless appearance.
6. Paint or Stain (Optional)
- If desired, paint or stain your wainscoting panels to match your room’s aesthetic.
- Use painter’s tape to protect adjoining walls and floors during this step.
Once complete, your new wainscoting will give your room a clean, classic look while adding value and warmth to your space.
Next, we will cover tips for how to install wainscoting in bathrooms and maintain your panels to ensure they stay beautiful for years.
Installing Wainscoting in Bathrooms and Care Tips
Wainscoting can add warmth and style to bathrooms, making small spaces feel more inviting while protecting your walls from splashes and everyday wear.
How To Install Wainscoting In Bathroom
- Check ventilation: Good airflow is essential to prevent moisture buildup behind your panels. Wainscoting is suitable for powder rooms and ventilated bathrooms but should not be installed in high-humidity areas like inside showers.
- Choose moisture-resistant panels: Use panels designed for interior use with durable finishes. Woody Walls’ panels can be used in bathrooms with normal humidity, provided the space is properly ventilated.
- Prepare the walls: Clean and dry the walls thoroughly before installation to prevent moisture from getting trapped behind the panels.
- Seal edges and seams: Apply caulk where the panels meet to prevent moisture seepage. Use a waterproof caulk for extra protection in areas prone to occasional splashes.
- Height considerations: Wainscoting can be installed at standard heights (around 36 inches) or higher to create a feature wall behind sinks or bathtubs, depending on your design goals.
Care and Maintenance Tips
- Regular cleaning: Wipe panels with a soft, damp cloth to remove dust and splashes. Avoid using harsh chemicals that may damage finishes.
- Check caulking periodically: Inspect seams and reapply caulk if necessary to maintain moisture protection.
- Avoid prolonged exposure to water: While panels can handle humidity, avoid letting water pool against them to ensure long-term durability.
Maintaining your wainscoting will help it retain its beauty while adding a timeless, elegant look to your bathroom for years to come.
Transform Your Space with Woody Walls
When you learn how to install wainscoting is one of the most effective ways to elevate your home’s style while adding warmth and character to any room. With the right preparation and panels, you can achieve a professional, timeless look without the hassle of a full renovation.
At Woody Walls, we believe in making beautiful design accessible. Our Acoustic Slat Wall Panels and Peel-and-Stick Wood Planks are crafted for easy, DIY-friendly installation while delivering stunning results. All our panels are made from sustainably sourced wood, finished with non-toxic materials, and are always in stock with fast, free US shipping, so you can transform your space without delays.
Whether you are updating your living room, hallway, or bathroom, adding wainscoting can completely change the feel of your home. It is a practical upgrade that protects your walls while adding architectural interest and classic beauty.
Ready to dress up your walls? Explore Woody Walls today and discover how easy it is to bring your vision to life.


